Thursday, August 8, 2019

French vs Prussians - battle report (concluding thoughts)


So, victory for the Prussians and a fairly convincing one in the end. The 6-3 victory banner total doesn't quite convey the whole story though. The French were very close to gaining a handful more victory banners themselves. At the end of the battle there were no fewer than four Prussian infantry units with only one stand remaining. Of the other two Prussian infantry units still on the table, one had two stands left and the other three. What was key, I think, was the careful withdrawals made by the Prussians to take those vulnerable single-stand units out of harm's way. It's very tempting when playing Commands & Colors to attack with every move, but judicious retreats are equally important!

"Bring out your dead!" - the French losses for the battle

And the butcher's bill for the Prussians. Their price of victory was paid in blood by the infantry.

I mentioned before that this wasn't a carefully thought out scenario. It was very much a 'thrown 'em down and play' game. That said, I did give some consideration to the terrain layout and knew that the Prussians were going to have the best chance of victory because of their strong position. There was enough balance to keep the game enjoyable and interesting for most of the turns, but if I were to change anything for next time I'd probably award the French an extra command card and perhaps one or two more units.

I liked how the terrain was a feature of the way the battle played out. Most of the printed C&C scenarios don't have large areas of adjoining hills like I did, but in many respects my large hill area on one flank felt more realistic (in a smaller scale battle sort of way), rather than lots of smaller one- or two-hex hills dotted about the place. The French really struggled on this side of the board. The uphill advantage of the Prussians was difficult to overcome, and in the end the French simply didn't have enough numbers, despite having plenty of cards for this section.

What was also a problem for the French was that they had too many cards for the right flank. After their initial success on the left flank, they couldn't follow it up, and for the entire battle their two heavy cavalry units simply stood and watched. I was particularly sad to see my recently painted Empress' Dragoons with nothing to do for the entire game!

The Prussians were patient and dogged, and careful to bring forward troops or withdraw them at the right time. Only when victory was there for the taking did they commit their cavalry for the coup de grĂ¢ce.

Of hexes and squares...

So, what did I think of playing Commands & Colors on a square grid (and a 10 by 8 grid at that!)? Well, in summary I'd say I was very pleased with how the game transported across. It certainly felt like a game of C&C. After all, I still had left, centre and flank sections. I still had the cards, the dice, the C&C units and stats, and all the other game features. The main difference - apart from shooting ranges - is with how the square grid affected movement.

I did find that units were less mobile, less able to nip across sections of the battlefield. Cavalry still had the advantage here, as should be the case, but even they didn't feel quite as free-ranging. I found that infantry units were sometimes unable to make sideways movements due to another unit already occupying the square next to them. In hindsight, this meant that initial deployments were crucial, and it was another reason, I think, why the French were at a disadvantage. A few of their line infantry units took too long to get moving forward because of artillery or other units being in the way. Some infantry never made it to the fight at all, whereas on the Prussian side every single infantry unit took part in the battle at some point or other.

I'm wondering if I might make some modifications to the game that would involve some sort of deployment phase of the game. At this stage, I have no idea what, but it would need to be something that is solitaire-friendly and would add to the narrative.

I might also modify the 'two square' diagonal hex range so that artillery can fire a bit further. Two diagonal squares in my game equates to a four-hex range in the original game, but it felt that the firing unit and the target weren't all that far apart. Perhaps the answer is to allow artillery to fire one diagonal at a cost of 1, but all successive diagonals cost 2. We'll see...

I final thought is that it will be interesting to see how extending the table width will make a difference. I have my next four tiles nearly finished, which will take the grid width from 10 to 12.

Speaking of narrative, I think the fact that I came away from the battle with what feels like a plausible story of how it all unfolded is a sign that the game was a success. That and, of course, the fact that I had great fun playing it!

I'll no doubt have more ideas and modifications to consider in the future, but I'm certainly encouraged by this first attempt and will look forward to setting up the board for another battle when I get the chance. Till next time!

Wednesday, August 7, 2019

French vs Prussians - battle report (part 3) - Turns 11 to 14

Apologies for some of the photos throughout this battle report being a bit blurry or badly illuminated. I hope to have more time and a better set-up next time for taking pictures.

So, on to the next (and final) part of the battle...

French light infantry drive off and destroy most of the jagers in front of the woods

Turn 11 for the French sees them play a strong 'Fire and Hold' card. On the left, the light infantry sweep the opposing jagers away from the edge of the woods, destroying one unit and driving the other back to the table edge. In the centre, the Prussian infantry suffer further losses with two of their units now reduced to a single stand.

Heavy losses in the centre leave two Prussian units with a solitary stand remaining

The Prussians respond on the opposite side of the battlefield, charging downhill with a full strength line infantry unit, which smashes into the French line and destroys a unit. The French leader escapes and takes cover in the unit behind.

Things are going well on the Prussian left as the line infantry charge downhill to wipe out an enemy unit

At the same time, reserves arrive in the centre to assist with the Prussian infantry holding out against the French chasseurs. The French cavalry decide to retire and reform, but the manoeuvre goes horribly wrong and the unit is reduced to a single stand.

Reinforcements arrive to help the Prussian reserve currently held in square

The chasseurs retire and reform, but pay a heavy price for doing so

The Prussians also take the opportunity to withdraw their two single-stand infantry units further back towards safety.

French victory banners: 3
Prussian victory banners: 3

In the ensuing turns the Prussians, sensing that victory might now be theirs for the taking, press home their advantage on their left flank. A unit of hussars charges across the hilltop and into the French lancers, which is still struggling uphill against the landwehr.

Hussars join in the fight on the hills

The unfortunate lancers are pinned in place and reduced to a single stand, while further down the hill the leading Prussian line infantry unit extends its battle honours by charging into the last remaining French line infantry unit in this section. The fight is short and bloody, and the French infantry are no more.

The Prussian line infantry continues the fight against another unit of French

Things aren't looking good for the French lancers...

The French left is now all but destroyed

At this point, most of the French command cards are still for operations on the right flank, but with that flank now almost completely destroyed, their options are limited. A combined arms attack in the centre leaves a Prussian reserve infantry unit badly mauled, but it stubbornly holds on and refuses to die.

The French perform a combined arms counter-attack against the Prussian reserve infantry in the centre...

...which stubbornly holds out with one stand

The centre of the battlefield is now thinning out a bit and the Prussian mounted landwehr seize the opportunity to enter the fray. They bear down on the French infantry before them, while at the same time the nearby Prussian reserve infantry that was in square now moves over to join the attack. The outnumbered French are destroyed, and the Prussians are now only one banner away from total victory.

French victory banners: 3
Prussian victory banners: 5

Mounted landwehr entry the fray, which spells doom for these French infantry

The French try to make some evasive manoeuvres and withdraw both of their depleted cavalry units.

The lancers desperately seek the safety of their own lines

In the centre, the two French foot artillery units valiantly try to push back against the strong Prussian line, but without much success.

French foot artillery fights on in the centre, but without much support

With victory now all but assured, the Prussians play a fitting last command card of the game...

The last card of the game!

It's time for the big cavalry pile in! On their left, the hussars charge into the retreating lancers, while in the centre the mounted landwehr, their blood up, charge the French guns. On the right, the Prussian horse artillery finally gets moving while the dragoons brave the difficult terrain in order to attack the French light infantry in the woods.

The French lancers make their last stand

Prussian landwehr cavalry charge the French guns

The Prussian right flank finally gets moving - better late than never!

The inevitable occurs and the French lancers are destroyed. The French foot artillery, and the light infantry in the woods, both decide they've had enough and begin what will be the whole retreat of the French army.

Victory for the Prussians!

French victory banners: 3
Prussian victory banners: 6

The fighting is done. The Prussians survey the battlefield from a hill on their left flank

The French begin their retreat

Prussian dragoons move through the trees, pursuing the retreating French light infantry

Here's a final look at the battlefield at the end of the day.

Battle's end. The Prussians claim the field while the French hitch up their cannons and withdraw

I'll write up a summary of my thoughts in the next post, but suffice to say it was a very enjoyable game.

Hope you enjoyed the action too!

Tuesday, August 6, 2019

French vs Prussians - battle report (part 2) - Turns 6 to 10

Having read and enjoyed a great many battle reports on the blogs of fellow wargamers, I'm well aware of how tricky it can be following along with someone else's attempt to describe the events of their game. This first attempt of my own is probably no exception, but I hope it's not entirely unclear how the battle is unfolding so far. However, this is proving to be a useful first learning experience and I do have some ideas on how I might make the reports easier to follow next time.

Back to the battle then...

At this point in the battle, four out of the five command cards held by the French are for manoeuvring on the right flank, so they decide it's time to get organised for an assault in this section by continuing to move infantry units forward.


Interestingly, of the four command cards held by the Prussians, three of them are for moving units on their left flank, so the fight on this side of the battlefield really is on!

The Prussians with their hilltop position are fairing better here, managing to hold the French in check and causing some significant casualties. However, a well-timed 'Rally' card from the French sees many of their line infantry units replenished, as well as the chasseurs Ă¡ cheval, which is restored to full strength. Game on!

On the right, the French 'Rally' and prepare for another assault

How things currently look in the centre
Once again, the French push forward on the right, taking losses, but this time they manage to keep going. Realising that they need to get to grips with the Prussians as quickly as possible, they throw forward their lancer unit, supported by some infantry.

French lancers and infantry finally make contact with the enemy
Simultaneously threatened by both both cavalry and infantry, the centre unit of Prussian landwehr decides (possibly unwisely) not to form square and is promptly ridden into the ground by the lancers. The victorious cavalry keep going and collide with another landwehr unit directly behind the first. This, too, take heavy losses, but one remaining stand grimly fights on.

With the Prussian landwehr annihilated, the French line infantry and their leader decide instead to charge the guns in front of them, but are duly shredded. A victory banner each for this round, and things are getting bloody on this side of the battlefield!

The Prussians respond by counter-attacking the lancers with a nearby unit of line infantry, and the French decide to retire and reform.

French lancers retire and reform further down the hill, while the Prussian line infantry move up to plug the gap in the line
There followed a lull in the action on this side while the French switched their attention to the centre, attacking with both artillery and infantry, but without much effect.

French artillery is pushed back in the centre, but a fresh unit of line infantry now moves up
The Prussian likewise attack in the centre and enjoy more success, managing to destroy one French line infantry unit.

At this point, the French played an 'Elan' card and attacked at various points across the battlefield. On the right, the lancers renew their uphill assault, this time engaging the landwehr unit in front. The wounded landwehr waver for a moment but hold fast with the help of an Iron Will counter.


On the left, the restored chasseurs are feeling confident again and decided to have another go at the Prussian reserve infantry directly opposite them. These two units are really slugging it out in this battle!


The Prussians form square again but this time don't manage to repulse the cavalry, and take a one stand loss.

A fresh unit of French line infantry marches up the centre

Meanwhile, over on the French left, not much has happened since the opening turns
At the end of the 10th turn, the victory banners number two each. The battle feels like it is finely balanced at the moment, with both sides having suffered significant losses. However, the French literally have an uphill fight on their hands. Victory is still possible for them, I think, but the greater Prussian numbers may prove too much. We'll see!
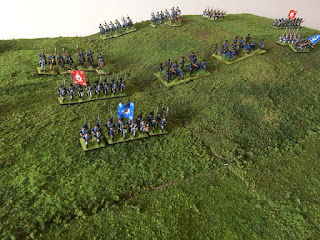


Monday, August 5, 2019

French vs Prussians - battle report (part 1) - Turns 1 to 5

I'm going to break this battle report into several parts to make it more manageable. This will be my first attempt at doing one on this blog, so apologies if it's not the best. I'm realising already that a bit of time is involved in the process!

I'll summarise in a way that I think is interesting, rather than giving a card-by-card account, which would probably be quite dull. I'll also add in some thoughts at the end with regards to how well the Commands & Colors system is coping with my square grid approach.

Here's a quick summary on what I decided for the scenario set-up:

French: 5 command cards, move first.
Prussians: 4 command cards, 2 Iron Will counters
Victory banners: 6

The scenario set-up isn't particularly important. I just want something that will allow me to play a decent number of turns to see how the rules cope, and what needs modified. I may play beyond the 6 victory banner total if I feel there's more to find out.

EDIT: Here's another look at the initial deployments, shown in the previous post. I've added some labels to help show where the various troops are positioned at the start of the battle. As mentioned already, this isn't a tried and tested scenario. I've simply thrown down some miniatures with a view to seeing how it plays out.

The initial set-up

So, on to the action!

French light infantry getting stuck in early on

In the first move of the game, the French pushed forward with their two light infantry units and occupied the wood on the left flank. The Prussian jägers opposing them were driven back with some heavy losses.

Two French light infantry units successfully occupy the woods on their left flank

French foot artillery in the centre steadily inflicts damage on the Prussian reserves opposite

The French foot artillery in the centre ground away at the Prussian reserve infantry unit directly opposite them, while on the French right flank units were shuffled around in preparation for a future advance.

For their part, the Prussians were fairly static in the early rounds. Some initial artillery fire proved quite ineffectual, but the leading units were reorganised a little in order to present a stronger defensive line against the French advance that was surely coming.

The Prussian left flank, preparing to defend itself against the oncoming French

Things continued to heat up on the French left flank when the Prussians finally responded by sending forward a unit of reserve infantry to reinforce the jägers. The French light infantry sustained moderate losses but held their ground inside the woods.

Prussian reserve infantry try to retake the woods

Eager to protect the advances they'd made on the left, the French light cavalry charged forward to help out the beleagered light infantry...

French light infantry force the Prussian reserves into square, but are themselves repulsed

...who promptly formed square and repulsed the attack!

The French light cavalry reform, ready to have another go!

Prussian line infantry join the action on the flank, driving back the French cavalry further

The Prussians followed this up by manoeuvring a unit of line infantry over to support the reserve infantry, and drove the light cavalry further back.

But the attack was not repulsed for long. A 'Forward' card from the French allowed them to respond on all fronts, particularly in the left and centre where a combined attack by a foot artillery, a line infantry unit and the returning light cavalry spelled doom for the now exposed Prussian line infantry unit.

The Prussian success is short-lived. A strong French counter-attack annihilates the Prussian line

Sure enough, when the gunsmoke cleared there was nothing left of the unfortunate Prussian line infantry. First blood to the French!


In answer, the Prussian guns roared out along their front line as they played a 'Fire and hold' card, hoping to decimate the leading French units in the centre. But, despite inflicting some significant casualties on the enemy infantry, the French held their nerve and looked set to press on with their attack.

So, a total of 5 turns played for each side and the current victory flag score is 1-0 to the French. Despite their early losses, however, the Prussians still have plenty of strength in reserve, and are holding the stronger positions. The French are surging forward, but are not without their own casualties. They will hope to come to grips with the Prussian front line as quickly as possible, and the next few turns could well be pivotal.

So, how are the rules playing out? Well, pretty good so far I'd say. It definitely feels like a Commands & Colors game, but the biggest difference comes from not having any diagonal movement for infantry units. It feels like infantry are a lot less manoeuvrable in the game, and a bit more planning has to go into co-ordinating both attack and defence.

I'm still allowing diagonal attacks from infantry units, which will mean they can advance diagonally into a vacated area after combat. Retreats can also be made diagonally, since to do otherwise would probably mean too many units would end up unable to retreat because of units deployed directly behind.

It's early days, but I'm liking how the action is unfolding so far. I'll continue with the report in the next post, once I have some spare time to play a few more turns. Hope you enjoyed this first part!

Sunday, August 4, 2019

First go at using the terrain tiles


I seem to have spent an awful lot of time lately thinking about terrain and trying to figure out the best way to play games of Commands & Colors using my 20mm collection. Every time I settle on an idea I seem to become dissatisfied with it a few days later. Most frustrating!

At the risk of sounding like the proverbial stuck record, the trouble is that I need a hex board that is small enough to be convenient and practical, but large enough to still be visually appealing. Although I can fit a reasonable number of 20mm figures on, say a 4-inch Hexon tile, when it comes to fitting buildings and other terrain on there as well, things get rather crowded and start to look odd.

I'm beginning to think that reconciling size with convenience is an impossible task, and that I'd be better off keeping the Hexon boards for use with my (still in progress) 10mm miniatures.

No doubt I'll change my mind another dozen times!

Anyway, in the meantime, I decided to crack on with building some more of the Terra-Former tiles from Sally 4th, and suddenly found myself wondering if I could somehow convert Commands & Colors into a game that uses squares rather than hexes. Nothing radical there - I'm sure other people have done it, but I haven't really searched around the web yet.

At the moment, I have enough tiles finished to make a 5 x 4 feet board, and I have another 4 tiles nearing completion.


Each 1-foot tile will represent four areas (ie. four 'hexes') in game terms, with one unit allowed in each area. This gives a game board that is 10 squares wide by 8 squares deep, which is obviously smaller that the 13 hex by 9 hex standard C&C board, but it's as big as I can make it at the moment. I could split each tile into 9 areas, but I think it would look a little cramped.

The middle section will be 4 areas wide, and the left and right sections will be 3 wide. Cards will be dealt and played as normal. Diagonal movement will be allowed, but will cost two movement, so only light infantry and cavalry will be able to move diagonally.


Beyond this, I haven't figured out what rules modifications will be required to get the game to work with squares rather than hexes, but the plan is to just play through a few games and see what works and what doesn't.

I've thrown down some miniatures in a fairly haphazard fashion, with the Prussians deployed along the far away table edge and having the more defensive position. They have a large hill on their left flank, and a smaller hill on their right which has an area of marshland and woods at the foot of it. There are no special rules for the road that winds across the board.


Those are my basic modifications to get me started, so I'll see how the game plays out. The Prussians have a slightly larger force and more defensive terrain, so I'll compensate by giving them fewer command cards. The French will move first. Rather than having a set victory point goal, I'll just keep playing until the battle reaches an obvious conclusion.

The view from the French left flank

French centre

The French right, looking towards the hills on the Prussian left

I'm quite pleased with how the tiles from Sally 4th look. The joins aren't always completely clean, and I've found that the MDF can warp a bit once you apply glue, paint, modelling textures etc. However, with a bit of battlefield 'dressing' the tile edges can be masked a bit so they're not jarringly obvious.


I'll take a few photos during the game and share my thoughts and findings in the next post.